

Android Studio build APK:
every step, honestly counted.

Founder, Newly
There are two menu items in Android Studio that produce an APK, and the one most people click first gives them a file Google Play will not accept. That is the whole reason this guide exists. Below is the complete path, fresh machine, first Gradle sync, keystore, Build > Generate Signed App Bundle or APK, output folder, phone, with the menu names as they read in Android Studio Quail 4 (2026.1.4). Google’s own documentation, and any Studio older than Quail, still call the same two items Build Bundle(s) / APK(s) and Generate Signed Bundle / APK. Same menu, same position, new labels.
At the end, the part a tool vendor is not supposed to write: a side-by-side count of the same job done in a browser. If you only need the artifact and never intend to open an IDE, you can build an APK without Android Studio and skip most of what follows. If you write Android code for a living, keep reading, the shortcut is not for you, and this page says why.
Key Takeaways
- Twelve rungs, about an hour. Most of a first Android Studio build is downloads and Gradle sync, not decisions.
- Build › Generate Signed App Bundle or APK is the path. Creating the keystore on that screen is the one step you cannot undo, lose it and the app can never be updated.
- Android Studio is free forever. Newly starts at $25 a month with no free tier, and on a fifth build a warm Gradle cache beats a cloud build.
- Newly’s route is six rungs. About 28 minutes including signup; the cloud APK build itself took six on the run behind this page.
The 20-second version
Android Studio build APK, in one line: click Build > Generate Signed App Bundle or APK, select APK in the dialog, click Next, create or choose a keystore, click Next, set the build type to release, click Create. Your file lands in build/outputs/ inside the module you built.
For a quick test build, skip signing entirely: Build > Generate App Bundles or APKs > Generate APKs gives you a debug-signed APK in one click. It installs on any phone. It cannot go on Google Play. Both paths come from Google’s app signing documentation, checked against the current release (Android Studio Quail 4, 2026.1.4) on 10 September 2026.
First, check the laptop can take it.
Most abandoned Android Studio installs are not a skill problem. They are a hardware problem discovered forty minutes in, when the emulator will not start or Gradle runs out of memory. Google publishes exact numbers, and they are higher than people expect.
| Requirement | Windows | macOS | Linux |
|---|---|---|---|
| Operating system | 64-bit Windows 10 or later | macOS 12 or later | 64-bit distro with Gnome, KDE or Unity; glibc 2.31+ |
| RAM | 8 GB (16 GB with emulator), 32 GB recommended | 8 GB (16 GB with emulator), 32 GB recommended | 8 GB (16 GB with emulator), 32 GB or more recommended |
| Free disk | 8 GB, or 16 GB with the emulator | 8 GB, or 16 GB with the emulator | 8 GB, or 16 GB with the emulator |
| CPU | Virtualization required (Intel VT-x or AMD-V, enabled in BIOS) | Apple M1 or newer; 6th-gen Intel Core at minimum, and Intel Macs are being phased out | Virtualization required (Intel VT-x or AMD-V) |
| Screen | 1280 x 800 minimum, 1920 x 1080 recommended | 1280 x 800 minimum, 1920 x 1080 recommended | 1280 x 800 minimum, 1920 x 1080 recommended |
Source: Install Android Studio, read 10 September 2026. If your machine falls short of that table, the answer is not a lighter IDE, it is someone else’s machine. That is the case for running Android Studio in a browser, which moves the 16 GB and the virtualization requirement onto a server you rent by the hour.
The walk-through, all twelve rungs.
Assume a clean machine and an Android project you did not write. Every menu name below is the one Google’s documentation uses. Where a step has a shortcut, it is called out inline rather than hidden at the bottom.
Steps 1 to 5: from download to a debug APK
Step 1
Download Android Studio
Get it from developer.android.com. The current line is Android Studio Quail 4, version 2026.1.4. Accept the SDK licence on the download page, then run the installer, nothing on this page depends on which channel you use.
Step 2
Let the setup wizard pull the SDK
First launch downloads the Android SDK, platform tools and a system image. This is the step that turns a two-minute install into a coffee break, and it is why the disk numbers in the table above are what they are. Do not cancel it halfway; a partial SDK produces build errors that read like code problems.
Step 3
Open the project and wait out the first Gradle sync
Open your project folder, not the file inside it. Android Studio resolves every dependency, downloads the Gradle distribution the project pins, and indexes the source. On a cold cache this is the longest single wait in the process. If the sync fails, read the bottom line of the error, not the top, the actual cause is usually a missing SDK platform version, and the IDE offers a link to install it.
Step 4
Set the applicationId and the version
In app/build.gradle (or build.gradle.kts), check three values: applicationId, which is the identity of your app on every device forever; versionCode, an integer that must increase with every upload; and versionName, the string humans see. Getting versionCode wrong is the single most common upload rejection later.
Step 5
Build the debug APK first
Build > Generate App Bundles or APKs > Generate APKs. This produces an APK signed with the SDK debug key, already aligned with zipalign, installable on any phone. It proves the project compiles before you start dealing with keys. Skip this step and every signing problem you hit next will be tangled up with a compile problem.
Steps 6 to 10: keystore, signing, output folder
Step 6
Open the signing dialog and choose APK
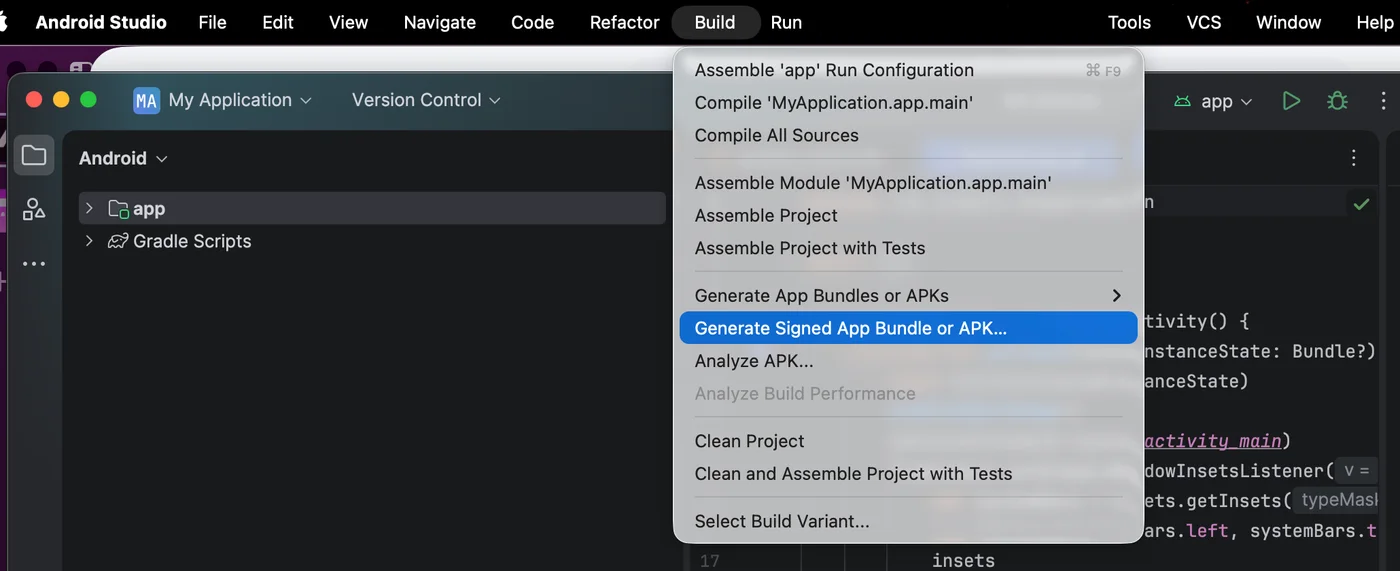
Build > Generate Signed App Bundle or APK opens a dialog titled Generate Signed App Bundle or APK. It offers Android App Bundle or APK. Pick APK, then Next. If you are heading for the Play Store rather than a phone, pick the bundle, more on that below.
Step 7
Create the keystore
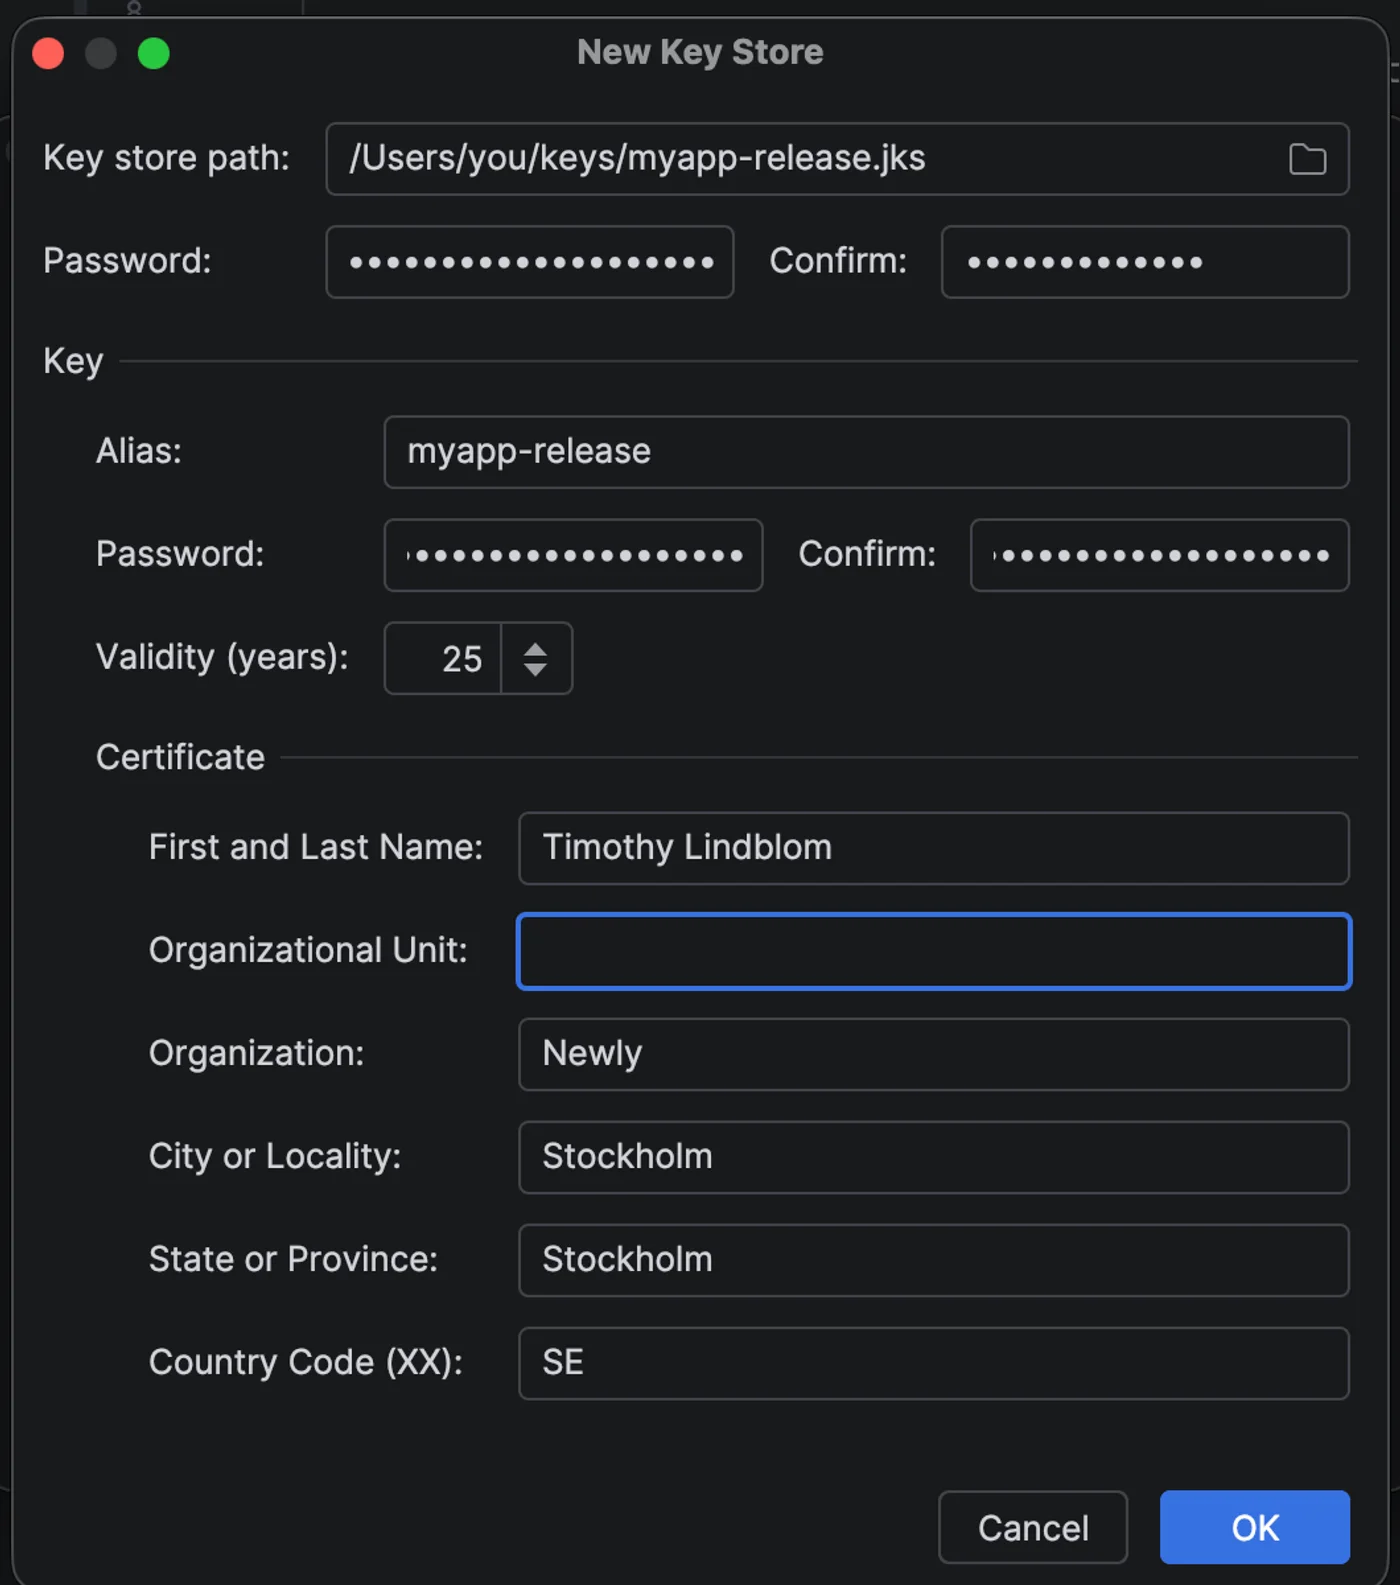
Below the Key store path field, click Create new. The New Key Store window asks for a path ending in .jks, a keystore password, a key alias, a key password, a validity in years, and certificate details. Google recommends at least 25 years of validity so one key covers the app’s whole life. This is the step people rush and regret; the details are in generating the keystore this step needs.
What each field actually does
- Key store path, a file on your disk holding one or more keys. Losing it is unrecoverable for sideloaded apps.
- Alias, the name of the key inside that file. You will be asked for it on every future build, so make it something you can remember without opening a text file.
- Validity (years), after expiry you cannot sign new updates with that key. Twenty-five is the documented floor, not a suggestion to shave.
- Certificate, name and location. It is not shown in your app, but it is baked into the certificate inside the APK.
Step 8
Destination, build type, signature versions
Next screen: choose the module, the destination folder, and the build type. Set it to release. If you are building an APK, Android Studio also asks which Signature Versions to support, the APK signature schemes. Product flavours, if the project has them, are selected here too.
Step 9
Click Create and let the release build run
A release build does more work than the debug build you already ran: shrinking, obfuscation and resource stripping if the project enables them. Expect it to take longer, and expect the first release build to surface R8 warnings the debug build never mentioned.
Step 10
Find the file
When the build finishes, a notification offers Locate and Analyze. Miss it and the file is still where it always is: build/outputs/ inside the module directory, which for a standard project means app/build/outputs/apk/release/. Analyze is worth one click, it opens the APK Analyzer and shows you what is actually taking up the megabytes.
Steps 11 and 12: get it onto a phone
Step 11
Turn on USB debugging
On the phone: Settings > About phone, tap Build number seven times, go back, and you will find Settings > Developer options with USB debugging inside it. Seven taps. It has been seven taps since Android 4.2 and it still surprises people.
Step 12
Install it
With the device connected: adb -d install path/to/your_app.apk. No cable? Put the file somewhere the phone can reach, Drive, email, a link, and Android will ask for permission to install from that source. Same file either way.
Or skip the IDE entirely and use Gradle
The dialogs are a front end. From the project root, gradlew assembleDebug writes module_name-debug.apk into project_name/module_name/build/outputs/apk/, already signed with the debug key. Once a signing config lives in your Gradle file, installRelease builds, aligns, signs and installs the release APK in one task. This is the same route CI uses, and it is the answer to “can I automate this?”, yes, and you should. Commands from Build your app from the command line.
Five things to check before you click Create.
Each one of these has cost somebody a rebuild, and the last one has cost somebody an app.
- Build type is set to release, not debug, the dropdown remembers whatever you picked last time
- versionCode is higher than the last build you shipped, or Google Play will reject the upload
- The .jks file and both passwords are already in your password manager, not just on the desktop
- The destination folder is somewhere you will find again, not the default deep inside the project
- You know whether this build is going to a phone, a device farm or a store, because that decides APK or AAB
Should this even be an APK?
Worth settling before you build. Google’s documentation is explicit: from August 2021, new apps are required to publish with the Android App Bundle on Google Play, and Play generates the per-device APKs from that bundle. So if the destination is the Play Store, the file you want is an .aab and the dialog above has a different first choice.
An APK is still the thing that installs on a phone. Testers, sideloading, device farms, enterprise fleets, stores that do not take bundles, all APK. Google’s own bundle FAQ describes publishing AABs on Play while publishing APKs on other stores and websites at the same time. Both formats, same project, same keystore.
The bundle route has its own set of gotchas around Play App Signing and upload keys, and they do not belong in the middle of an APK walk-through. If that is where you are heading, read up on the AAB that Google Play requires instead before you generate a key you will be stuck with. Sources: About Android App Bundles and the App Bundle FAQ.
Twelve rungs, or six. Then count again.
Everything above is one ladder. Here it is next to the other one, on a shared clock, including the rungs a vendor diagram usually leaves off, like paying and waiting. Then switch the tab. On your fifth APK the picture reverses, because a warm Gradle cache is faster than any cloud build and always will be.
Android Studio
12 steps · about 59 min · free
Newly
6 steps · about 26 min · paid plan
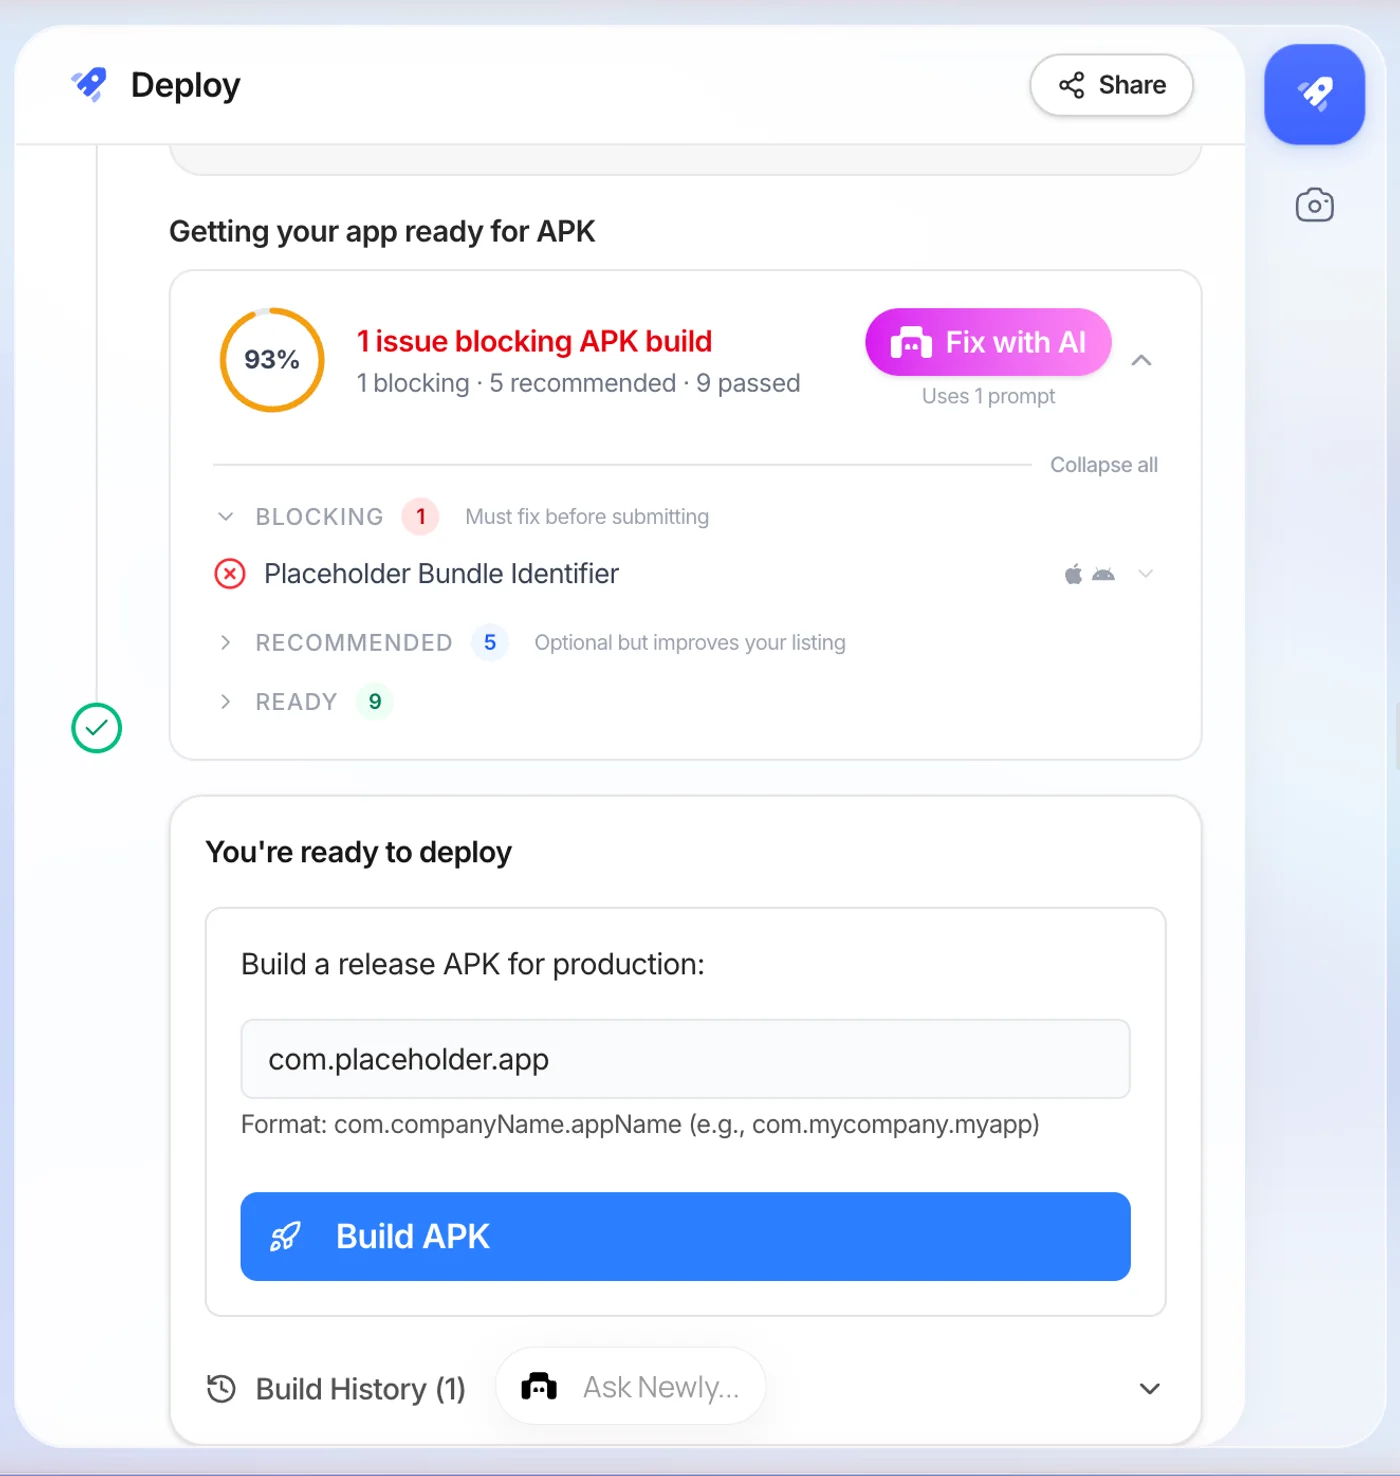
The right-hand ladder is Newly, an AI app builder: you describe the app, it writes a React Native and Expo project, and the Deploy panel builds the signed APK on its servers. No SDK, no keystore window, no Gradle. The bundle identifier field wants the same value as applicationId, in the same com.companyName.appName format, which is a decent hint that nothing magic is happening, it is your Gradle build, running somewhere else.
Two honest deductions. Newly has no free tier; Android Studio is free forever, and for anyone who already has it installed that alone settles the question. And for an app that needs a specialised native module, Newly’s own FAQ says you may need engineering help at some point, which means the IDE, which means you were always going to be here.
When the twelve steps are the right answer.
An IDE is not overhead you tolerate to get a file. It is the debugger when a crash only reproduces on a Pixel 6a, the layout inspector when a view is 4dp off, the profiler when a list stutters, and the APK Analyzer when the download size doubles overnight. Nothing in a browser replaces those.
Install it if you are changing Kotlin or Java by hand, if you depend on a native library with its own Gradle plugin, if your build is already wired into CI, or if you are joining a team whose project you did not create. In all four cases the setup cost is paid once and the per-build cost afterwards is a couple of minutes.
Skip it if you have no Android project yet, no plans to write Kotlin, and a laptop that cannot spare 16 GB. Those are different people with different problems, and pretending one tool serves both is how comparison pages get written by people who have used neither.
Questions people actually ask.
For a test build, use Build > Generate App Bundles or APKs > Generate APKs, which produces an APK signed with the debug key. For a build you can distribute, click Build > Generate Signed App Bundle or APK, choose APK in the Generate Signed App Bundle or APK dialog, click Next, select or create a keystore, click Next again, then pick a destination folder, set the build type to release, choose the signature versions and click Create. Android Studio writes the file to the build/outputs/ directory inside the module you built.
You now know exactly what the twelve steps cost.
If the app you want does not exist yet, most of that cost buys you nothing you asked for. Describe the app instead, and the signed APK comes out the far end, from $25 a month, no SDK on your disk.
Skip the toolchain and build your APK